Introduction to CSS border: Here's How To Use It “Newbie Guide”
What is the border in CSS?
Here is a list of all CSS border properties:
| Property | Description |
| border-style | This property is used to define the style of the border, such as solid, dotted, dashed, double, groove, ridge, inset, or outset. |
| border-width | This property is used to define the width of the border, in pixels, ems, or other units. |
| border-color | This property is used to define the color of the border. |
| border-top-style | This property is used to define the style of the top border. |
| border-top-width | This property is used to define the width of the top border. |
| border-top-color | This property is used to define the color of the top border. |
| border-right-style | This property is used to define the style of the right border. |
| border-right-width | This property is used to define the width of the right border. |
| border-right-color | This property is used to define the color of the right border. |
| border-bottom-style | This property is used to define the style of the bottom border. |
| border-bottom-width | This property is used to define the width of the bottom border. |
| border-bottom-color | This property is used to define the color of the bottom border. |
| border-left-style | This property is used to define the style of the left border. |
| border-left-width | This property is used to define the width of the left border. |
| border-left-color | This property is used to define the color of the left border. |
| border-image | This property is used to add an image to the border. |
| border-radius | This property is used to create rounded corners on the border. |
CSS Border Style
- dotted - Defines a dotted border
- dashed - Defines a dashed border
- solid - Defines a solid border
- double - Defines a double border
- groove - Defines a 3D grooved border. The effect depends on the border-color value
- ridge - Defines a 3D ridged border. The effect depends on the border-color value
- inset - Defines a 3D inset border. The effect depends on the border-color value
- outset - Defines a 3D outset border. The effect depends on the border-color value
- none - Defines no border
- hidden - Defines a hidden border
p.dotted {border-style: dotted;}p.dashed {border-style: dashed;}p.solid {border-style: solid;}p.double {border-style: double;}p.groove {border-style: groove;}p.ridge {border-style: ridge;}p.inset {border-style: inset;}p.outset {border-style: outset;}p.none {border-style: none;}p.hidden {border-style: hidden;}p.mix {border-style: dotted dashed solid double;}{codeBox}
CSS Border Width
Syntax:
border-width: your value;{codeBox}
p.one {border-style: solid;border-width: 5px;}p.two {border-style: solid;border-width: medium;}p.three {border-style: dotted;border-width: 2px;}p.four {border-style: dotted;border-width: thick;}{codeBox}
Specific Side Widths:
p.one {border-style: solid;border-width: 5px 20px; /* 5px top and bottom, 20px on the sides */}p.two {border-style: solid;border-width: 20px 5px; /* 20px top and bottom, 5px on the sides */}p.three {border-style: solid;border-width: 25px 10px 4px 35px; /* 25px top, 10px right, 4px bottom and 35px left */}{codeBox}
CSS Border Color
CSS Border Color Syntax
Border-color: your color;{codeBox}
CSS Border Color Values
- Keywords: CSS supports a number of named colors, including red, green, blue, yellow, purple, black, white, and many others. These are easy to use and remember, but they can limit your options somewhat.
- RGB values: RGB values use a combination of red, green, and blue values to create a specific color. Each value can range from 0 to 255. For example, rgb(255, 0, 0) represents pure red.
- RGBA values: RGBA values are similar to RGB values, but they include an additional alpha channel that determines the opacity of the color. The alpha value can range from 0 (fully transparent) to 1 (fully opaque). For example, rgba(255, 0, 0, 0.5) represents a semi-transparent red.
- HEX values: HEX values are a way of representing colors using a combination of six hexadecimal digits. Each pair of digits represents the red, green, and blue values, respectively. For example, #FF0000 represents pure red.
Using Multiple Border Colors
border: top-color right-color bottom-color left-color;{codeBox}
border: 5px solid #FF0000;border-top-color: #00FF00;border-right-color: #0000FF;border-bottom-color: #FFFF00;border-left-color: #FF00FF;{codeBox}
CSS Border Sides
Example:
p {border-top-style: dotted;border-right-style: solid;border-bottom-style: dotted;border-left-style: solid;}{codeBox}
<!DOCTYPE html><html><head><style>p {border-style: dotted solid;}</style></head><body><h2>Individual Border Sides</h2><p>2 different border styles.</p></body></html>{codeBox}
So, here is how it works:
If the border-style property has four values:
- border-style: dotted solid double dashed;
- top border is dotted
- right border is solid
- bottom border is double
- left border is dashed
If the border-style property has three values:
- border-style: dotted solid double;
- top border is dotted
- right and left borders are solid
- bottom border is double
If the border-style property has two values:
- border-style: dotted solid;
- top and bottom borders are dotted
- right and left borders are solid
If the border-style property has one value:
- border-style: dotted;
- all four borders are dotted
<!DOCTYPE html><html><head><style>body {text-align: center;}/* Four values */p.four {border-style: dotted solid double dashed;}/* Three values */p.three {border-style: dotted solid double;}/* Two values */p.two {border-style: dotted solid;}/* One value */p.one {border-style: dotted;}</style></head><body><h2>Individual Border Sides</h2><p class="four">4 different border styles.</p><p class="three">3 different border styles.</p><p class="two">2 different border styles.</p><p class="one">1 border style.</p></body></html>{codeBox}
Individual Border Sides
4 different border styles.
3 different border styles.
2 different border styles.
1 border style.
CSS Shorthand Border Property
- border-width
- border-style (required)
- border-color
p {border: 5px solid green;}{codeBox}
Some text
Left Border
p {border-left: 6px solid red;}{codeBox}
Some text
Bottom Border
p {border-bottom: 6px solid red;}{codeBox}
Some text
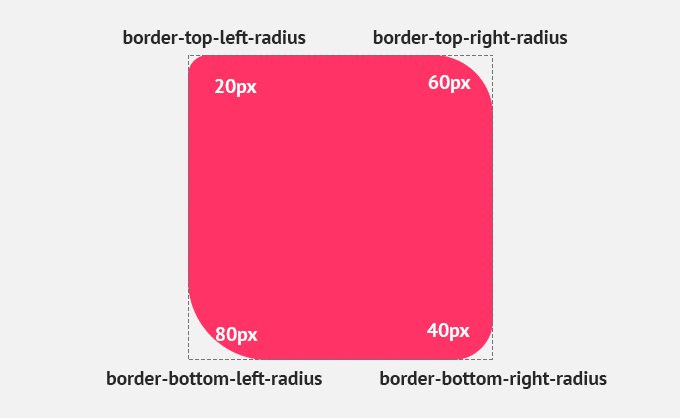
CSS Rounded Borders
.border {border-radius: 10px;}{codeBox}
.border {border-top-left-radius: 10px;border-top-right-radius: 20px;border-bottom-right-radius: 30px;border-bottom-left-radius: 40px;}{codeBox}
.border {border-radius: 10px 20px 30px 40px;}{codeBox}
Conclusion:
| Property | Description |
|---|---|
| border | Sets all the border properties in one declaration |
| border-bottom | Sets all the bottom border properties in one declaration |
| border-bottom-color | Sets the color of the bottom border |
| border-bottom-style | Sets the style of the bottom border |
| border-bottom-width | Sets the width of the bottom border |
| border-color | Sets the color of the four borders |
| border-left | Sets all the left border properties in one declaration |
| border-left-color | Sets the color of the left border |
| border-left-style | Sets the style of the left border |
| border-left-width | Sets the width of the left border |
| border-radius | Sets all the four border-*-radius properties for rounded corners |
| border-right | Sets all the right border properties in one declaration |
| border-right-color | Sets the color of the right border |
| border-right-style | Sets the style of the right border |
| border-right-width | Sets the width of the right border |
| border-style | Sets the style of the four borders |
| border-top | Sets all the top border properties in one declaration |
| border-top-color | Sets the color of the top border |
| border-top-style | Sets the style of the top border |
| border-top-width | Sets the width of the top border |
| border-width | Sets the width of the four borders |


